
You hit print, walk over to collect your document, and something is clearly wrong. The colors are faded, there are white streaks running through the page, or one color has vanished entirely. Before you start swapping cartridges or calling a technician, you need to run an ink test. An ink test for your printer takes less than five minutes, uses a single sheet of paper, and tells you exactly which ink channel is causing the problem — so you fix the right thing the first time instead of guessing. This guide walks you through the whole process from start to finish.
What Is a Printer Ink Test and Why Do You Need One?
A printer ink test is a diagnostic print that isolates each ink channel — Cyan, Magenta, Yellow, and Black — into separate solid blocks or patterns so you can evaluate them independently. Instead of looking at a finished document where all four inks are mixed together and problems are hard to pinpoint, a test print gives you a clean visual readout of each channel on its own.
This matters because the symptom you see on a finished print rarely tells you which ink is responsible. A photo that looks slightly green could mean the magenta is low. A document with white horizontal streaks could be a partially clogged cyan nozzle, a misaligned printhead, or simply a cartridge that has run dry. Without a dedicated test print, you are guessing.
Running a proper ink test tells you:
- Which specific ink channel is failing, clogged, or empty
- Whether the problem is a complete failure or a partial blockage
- Whether you need a cleaning cycle, a new cartridge, or something else entirely
- Whether the printer is performing correctly before you waste expensive photo paper or presentation stock on a real job
It is the single most useful diagnostic step you can take, and it is completely free.
Step One: Run Your Printer's Built-In Nozzle Check
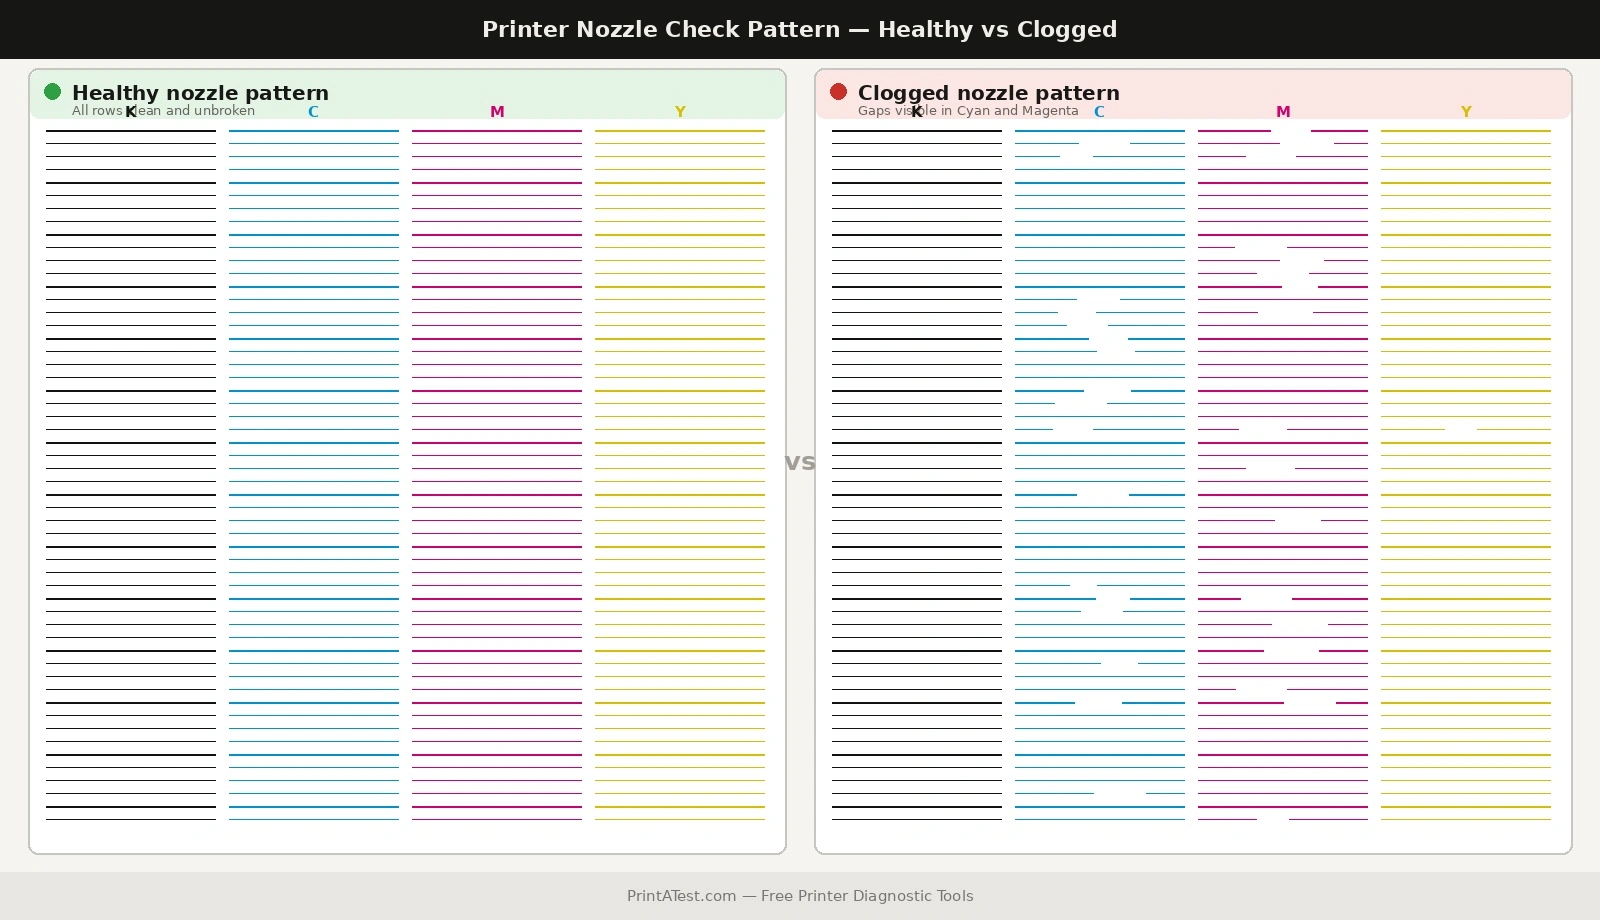
Most inkjet printers have a built-in nozzle check pattern you can print directly from the control panel or the driver software. This is worth running first because it gives you a granular view of which specific nozzle rows within each channel are blocked, rather than just which color is affected overall.
Here is how to access it on the most common printer brands:
- HP: Settings → Printer Maintenance → Print Quality Diagnostics, or open the HP Smart app and go to Advanced Settings → Printer Reports.
- Epson: On the control panel, go to Settings → Maintenance → Print Head Nozzle Check. From Windows or Mac, open the printer utility software and select Nozzle Check.
- Canon: Settings → Maintenance → Print Nozzle Check Pattern on the control panel, or through the Canon IJ Printer Utility on your computer under the Maintenance tab.
- Brother: Ink → Test Print → Print Quality on the control panel, or through the printer's web interface at its local IP address.
The printed pattern will show rows of fine lines or dots for each color. Any row that looks broken, has gaps, or is completely missing indicates a blocked or failing nozzle in that channel. A perfectly healthy channel produces clean, unbroken lines from one side to the other.
Step Two: Run a Solid Color Ink Test for Each Channel
The built-in nozzle check is good for identifying which rows are blocked. But for a clear, unambiguous view of whether each ink channel is actually delivering consistent, full-strength output across the whole page, a solid-fill color test is more useful — and easier to read at a glance.
We have individual full-page test prints for each ink channel. Print these one at a time and examine each result before moving to the next:
- Cyan Test Page — prints a full-page solid cyan block. Any horizontal white streaks, vertical banding, or faded patches indicate a partial or full cyan nozzle blockage.
- Magenta Test Page — same approach for the magenta channel. Fading on the left or right side of the block often indicates ink running low rather than a clog.
- Yellow Test Page — yellow is the hardest channel to judge on a white background at a glance, but streaks and gaps are still clearly visible. Yellow clogs most often from extended non-use because it is the least frequently used color in most documents.
- Black & White Test Page — a solid black block for testing the black ink channel. Critical for diagnosing faded text, grey-looking black prints, and horizontal banding in documents.
If you want to test all four channels on a single sheet before printing individual pages, start with our CMYK Test Page — it prints all four solid color blocks side by side so you can identify the failing channel immediately and then move to its dedicated single-color test for a full-page assessment.
Step Three: Read the Results Correctly
Once your test prints are in hand, here is how to interpret what you are seeing:
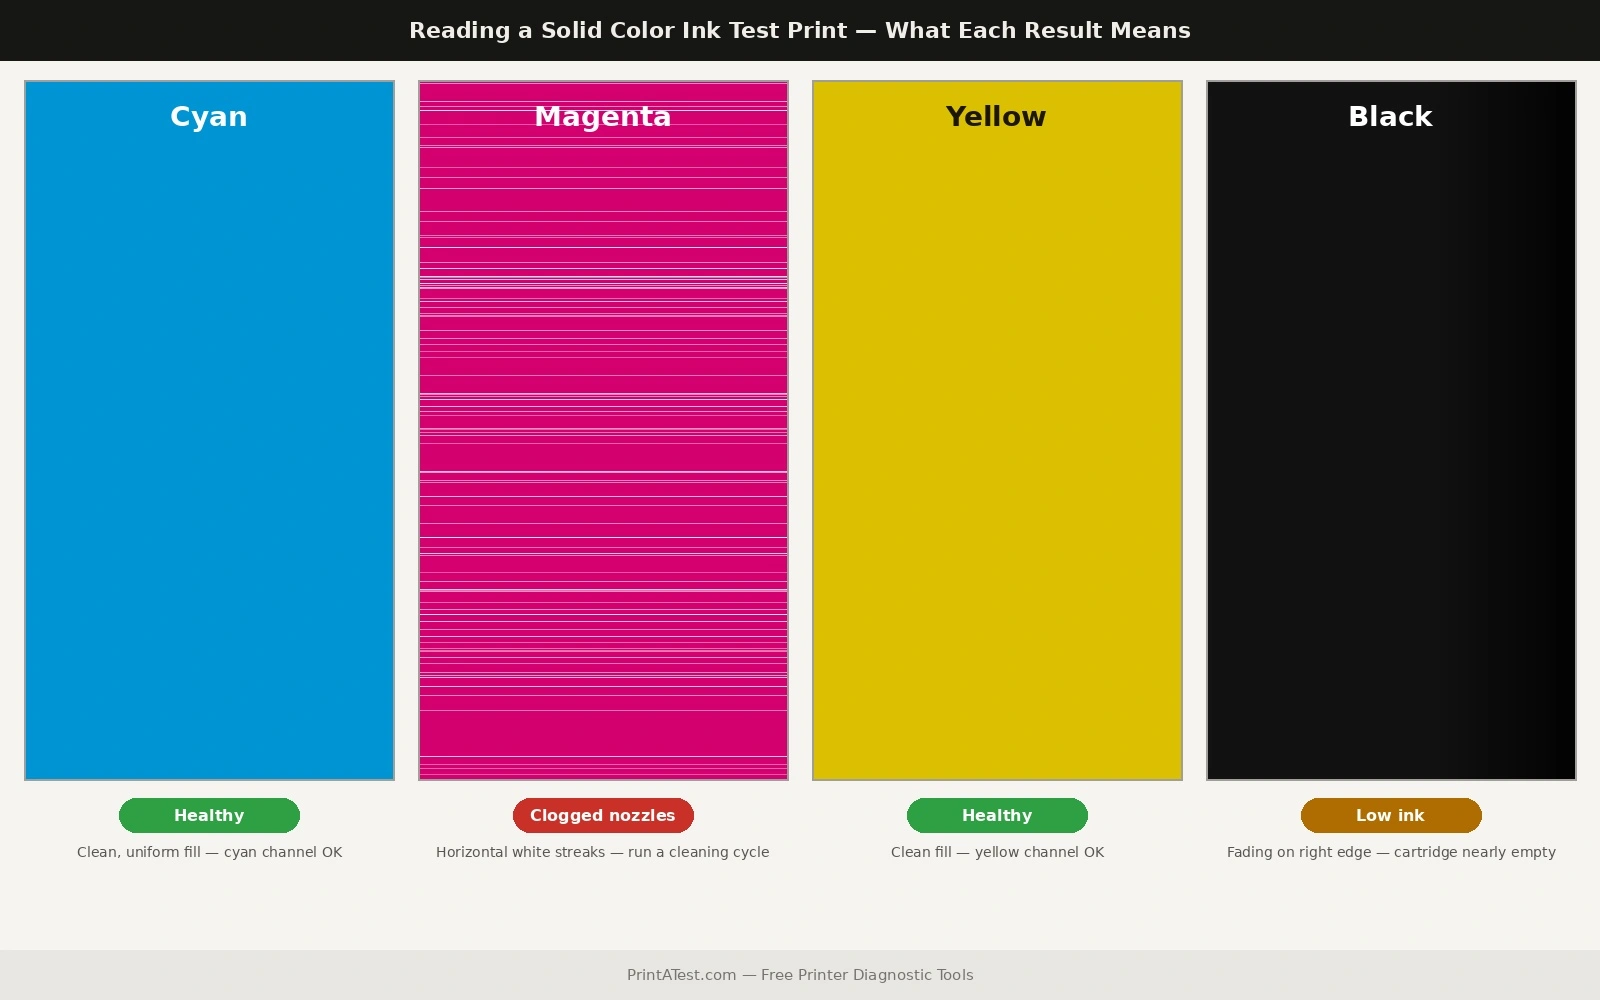
- Horizontal white streaks running across the page: This is the most common result and almost always indicates a partially clogged printhead nozzle. The streaks appear because specific nozzle rows are blocked and not depositing ink as the printhead passes across the page. Run a cleaning cycle through your printer's maintenance menu and reprint the affected color's test page.
- Gradual fading from one side of the block to the other: This typically means the cartridge is running low on ink rather than a clog. Check your ink levels and replace the cartridge if it is below 10–15%.
- An entire color block missing or printing as a near-white page: The cartridge is either empty, completely clogged, or not being detected by the printer. Check that the cartridge is fully seated, check ink levels, and run a deep cleaning cycle if levels are adequate.
- Blotchy or uneven coverage with no clear streaks: Often indicates air bubbles in the ink line, which can happen after a cartridge change. Running one or two cleaning cycles usually resolves this.
- The block looks perfect: The ink channel is healthy. The problem you saw on your original document is likely a settings issue — check your print quality settings, color profile, and paper type selection in the print dialog.
Step Four: Act on What the Test Tells You
Your test results will point you toward one of four actions. Here is the decision tree:
- Partial streaks or gaps → Run a cleaning cycle. Access this through your printer's control panel under Maintenance or through the driver utility software on your computer. After the cycle completes, reprint the affected color's test page. If improvement is visible but incomplete, run a second cycle. Allow 30 minutes between cycles to avoid overheating the nozzles.
- Gradual fading or very faint output → Replace the cartridge. Low ink does not improve with cleaning. Continuing to run cleaning cycles on a near-empty cartridge can permanently damage the nozzles by running them dry under suction pressure. Replace and retest.
- Persistent streaks after three cleaning cycles → Try a manual printhead clean. Dampen a lint-free cloth with distilled water and gently wipe the nozzle plate on the bottom of the cartridge. Let it dry for five minutes before reinstalling. On printers with a fixed printhead in the body rather than in the cartridge, a printhead cleaning kit with a syringe and cleaning solution can flush stubborn dried-ink blockages that the built-in pump cannot shift on its own.
- Complete color failure that cleaning does not resolve → The nozzles may be permanently blocked or the cartridge has failed. A fresh genuine cartridge is the next step. If the printhead is fixed and separate from the cartridge, a replacement printhead unit will restore full output without replacing the entire printer.
For persistent clogs that will not clear with the printer's built-in cleaning utility, a printhead cleaning kit — typically a syringe, cleaning solution, and adapter tips designed for your specific cartridge type — can often revive a nozzle that appeared permanently blocked. These are available for most major printer families and are considerably cheaper than a replacement cartridge or printhead.
How Often Should You Run an Ink Test?
You do not need to run a full ink test every time you print. But there are specific situations where running one before you start saves you time, paper, and frustration:
- Before any important print job — a presentation, a photo print, a document you only have one copy of. Thirty seconds running a test print is faster than reprinting a ruined job.
- After the printer has sat unused for two weeks or more — ink dries in the nozzles during extended non-use, particularly in yellow channels. A quick test print tells you whether a cleaning cycle is needed before you start.
- After installing a new cartridge — new cartridges occasionally introduce air bubbles into the ink line. A test print after installation confirms everything is working before you commit to a real job.
- When print quality suddenly drops without obvious explanation — run the test before adjusting any settings. If a channel is partially clogged, no amount of settings adjustment will fix it and you will waste time going in the wrong direction.
For regular users, running a quick CMYK test once a month keeps you ahead of developing clogs and means you will never be caught off guard by a failing ink channel mid-job.